Tag
The Tag command is used to display labels with texts referencing VisualARQ object properties in the model.
Tags can be inserted for a multiple selection of objects at once, or selecting the referenced objects one by one, allowing the user to define the tag insert position for each object.
Insert a Tag
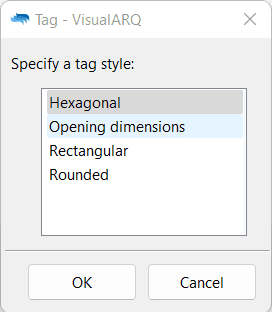
After running the command, the Tag insert dialog box will appear. Follow the steps from the command line. Press the right mouse button or ENTER to accept and go to the next step.

Tag insert dialog
Insert tags for a multiple selection of objects:
Steps:
- Specify a tag style from the insert dialog box.
- Select the objects to tag.
The tag will be created automatically next to the selected object, at an automatic distance. Multiple objects can be selected before running the vaTag command, so when it runs, the step to select the objects is omitted.
Insert tags for objects selected one by one:
Steps:
- Specify a tag style from the insert dialog box.
- Select the Point option in the Command line.
- Select the Object to tag.
- Specify the Insert Point of the tag.
You can repeat the two last steps to insert tags for different objects and define the tag insert point individually.
Note:When the tag label is empty, it means that the property or parameter the tag is referencing has no data. Assign a value to the referenced property (i.e "name", "description", "tag", etc) from the VisualARQ object Properties or to the referenced parameter from the Parameters section
, both in the Rhino Properties panel
Tag control points
Tag objects don't have control points. They can be moved independently from their reference objects position. When their reference objects are moved, tags move automatically too, keeping their relative position, unless the Fixed Position option is on.
Delete a tag
Simply select the tag and delete it.
Tag visibility
Tags are created laying on the World Top construction plane. It is not possible to show them in Elevation views.
When a level's cut plane is activated, only tags located in that level will be displayed in plan views.
- Use the vaProperties command, then select a Tag and press Enter, or
- Click on
 ,
then select a Tag and press Enter, or
 - Select a Tag and open the context menu by pressing the right mouse button for a while then select Tag > Properties, or,
- Double click on a Tag object.
Insertion Options and Parameters
The following parameters can be defined by each Tag object,
after they have been created. They can be edited in the VisualARQ Properties
section (in the Rhino Properties Panel  ).
).
General
- Type: tag.
- Name: a field to distinguish the tag object from other tag objects.
- Description: a field for custom notes.
- Style: list of tag styles available in the document.
Tag
- Position: the tag world XYZ coordinates.
- Fixed position: option to fix the position of the tag, even though its reference object is moved.
- Orientation: tags can be aligned with the object in three different ways:
- Vertical: the tag will be oriented along the Y axis.
- Horizontal: the tag will be oriented along the X axis.
- Aligned: the tag will be oriented following the object path curve.
- Contents: the contents of the text displayed in the tag. You can add referenced properties and custom texts.
- Use the syntax "%<element.tag>%" to display referenced common properties. In this case, the "tag" string in this syntax corresponds to the "Tag" property field of the referenced object. (See the examples at the end of this page).
- Use the syntax "%<element.parameters["Name"]>%" to display custom parameters and parameters of Grasshopper styles.
- Use the syntax "%<element.style.parameters["Name"]>%" to display parameters of the object style.
- Use the code "\n" to separate the text in different lines.
- In addition to the mentioned syntax, you can add any text to display custom texts.
ExampleFor a door whose tag reference text is "D3", you can type in the tag's Contents field "Door %<element.tag>%" to display "Door D3" in the label.

Tag examples
Common properties
Use the corresponding syntax for the following common properties, in the tag's Contents field:
- Height: %<element.height>%
- Width: %<element.width>%
- Elevation: %<element.elevation>%
- Name: %<element.name>%
- Area: %<element.area>%
- Volume: %<element.volume>%
- Length: %<element.length>%
- Style's name: %<element.style.name>%
- Profile dimensions (for beams or columns): %<element.profile.width>% or %<element.profile.height>%
- Wall layer thicknesses: %<element.layerThicknesses[0]>% (where "0" corresponds to the index of the layer in the wall)
- Wall layer offsets: %<element.layerTopOffsets[0]>% and %<element.layerBottomOffsets[0]>% (where "0" corresponds to the index of the layer in the wall)
