Curtain Wall Styles
 right click
[left click]
The curtain wall style defines the curtain wall features. The following parameters can be specified for each style: Name, Attributes, Panel and Location.
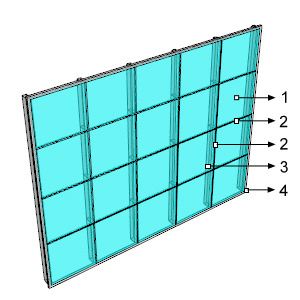
The curtain wall styles are defined by different components that can be added or deleted at any time: Cell, Frame, Mullions and Supports.

Different parts and components of a Curtain Wall:
 Cell
Cell Mullion
 Support (vertical)
 Frame
Frame
After running the vaCurtainWallStyles command, the curtain wall Style Manager dialog box will appear. All curtain wall styles are created and edited from this dialog.

Style Manager dialog box for the curtain wall object
New curtain wall style:
You can create new styles and duplicate existing ones from the different options in the curtain wall Style Manager.
Curtain wall styles can be created as regular curtain wall styles, or as Grasshopper styles (styles driven by a Grasshopper definition).
When clicking on the New Style... button, select one of the two options available, which will create a new style, or open the Grasshopper style wizard:
- Curtain Wall style: a new curtain wall style is created with the default components and parameters.
- Grasshopper style: follow the steps of the wizard to create a new style from a Grasshopper definition:
- Grasshopper definition
- Global values configuration
- Geometry
- Parameters
Delete a curtain wall style:
You can delete curtain wall styles from the curtain wall Style Manager dialog box. You can only delete those styles that are not being used by any existing curtain wall in the model.
Edit a curtain wall style:
- Use the vaStyleProperties command, then select a curtain wall and press Enter, or
- Right click on
 ,
then select a curtain wall and press Enter, or
 - Select a curtain wall and open the context menu by pressing the right mouse button for a while, then select Curtain Wall > Style Properties, or
- Press Alt, Shift or Ctrl, then double click on a curtain wall object.
Select the curtain wall style or a curtain wall component item at the top left panel, and edit their different parameters from the tabs that appear in the right panel.
Add a new curtain wall component:
- Context menu: do right-click on the curtain wall style name to open the context menu, and select New > "Component item".
- New icon
 : select the curtain wall style and click on the New icon, from the dialog toolbar. Select "Component item".
Delete components: use the Context menu (right-click on the component to delete and select Delete) or the Delete button ![]() .
.
Attributes
Attributes define the features of each curtain wall style and its components for display and print purposes. Check the list of attributes available.
Panel
This option determines whether the curtain wall panels will be curved or flat, when the curtain wall is created from an arc or a non straight curve.
Location
The curtain wall panel position relative to Frame. There are three alignment options available: Interior, Center and Exterior.
Parameters
In this tab you can create custom parameters by style and assign values by style.
These values can be overwritten by object, from the Parameters section  , in the Rhino Properties panel
  .
.
Curtain wall components
Cell 
The Cell component determines the curtain wall design and how the panels will be distributed along the curtain wall area. It is defined by the following parameters:
Division
Types
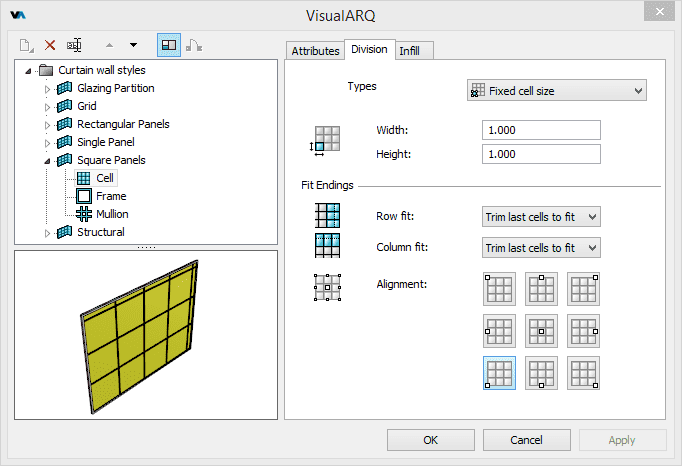
The division of the Cell component determines how the curtain wall is divided. There are 5 different division types:
1. Fixed number of cells ![]()
Determines the number of curtain wall cells according to a fixed number of horizontal and vertical divisions, regardless of the curtain wall length and height in the model.
- Keep division count after extending to surfaces: when curtain walls are extended vertically to other geometry with the vaCurtainWallExtend command, the area of the curtain wall may vary. This option will keep the division count on the resulting curtain wall area. When it is disabled, the number of cells will be repeated (or reduced) according to the new curtain wall area, and the original height of the curtain wall.
2. Fixed cell size ![]()
Fixes the cell size regardless of the curtain wall length and height in the model.
- Fixed cell width: the cell size will be repeated along the curtain wall length direction. When this option is disabled, there will be a single cell along the curtain wall length.
- Fixed cell height: the cell size will be repeated along the curtain wall height. When this option is disabled, there will be a single cell along the curtain wall height.
Fit endings: since the curtain wall object length and height may not be multiple of the cells dimensions, there are some parameters that help to adjust the position of the grid division along a curtain wall object in the model:
 Row fit: option to specify whether the last
cell of each row of the curtain wall object extends to fit with the end or
is trimmed.
 Column fit: option to specify whether the last
cell of each column of the curtain wall object extends to fit with the end or is trimmed.
 Alignment: option to specify the position from which the grid division will be created from along the curtain wall object.
3. Horizontal division ![]()
By default, it generates two Cell components divided horizontally.
New Cell components can be added by doing right click on the Cell component > New > Cell. Each subdivision panel takes a "None" division type by default, but it can have any other type of division, and get subdivided again.
The Cell components that have an horizontal division can have their subdivision cells size defined as a percentage value (%) or a real size value.
NoteIf a cell component is divided again as a vertical or horizontal division type, it can only have its width/height value defined as a fixed size, in case its parent cell width/height is set to fixed size too.
4. Vertical division ![]()
By default, it generates two Cell components divided vertically. It works in the same way as the Horizontal division type.
5. None ![]()
Generates a single panel with no subdivision.
Infill
The infills determine how each cell composing a Curtain Wall is filled.
- Types
 : There are 3 different Infill types:
 Single Panel: Each cell is filled with a single panel.
 Empty: Each cell appears empty.
 Curtain Wall: Each cell is filled with a curtain wall style.
- Panel Thickness: When the infill panel thickness is 0, it is represented as a single surface.
- Curtain Wall Style: this option shows the list of curtain wall styles available when the infill type is set to Curtain Wall.
- Panel margin: space left among panels at their horizontal and vertical joints.
Frame 
Curtain walls can have a frame. Curtain walls can only have one Frame component, which is defined by the following parameters:
Horizontal & Vertical profile
The shape of frame profiles can be assigned differently to the top and bottom parts (horizontal profile) than to the side parts of the frame (vertical profile):
 Profile: The frames shape is defined by a profile and by its size. This list shows the profiles available for the frame component,
including the custom profiles created with the vaProfileFromCurve
 command, or from the Profile Manager.
 Rotation: angle by which the frame rotates around its axis, taking as the center of rotation the central point of its profile area.
- Sizes: The parameters corresponding to the frame sizes will vary in accordance with the type of profile selected.
Mullions 
Curtain walls can have mullions. The mullion component represents the frames situated at cells divisions. Curtain walls can only have one mullion component, which is defined by the following parameters:
Horizontal & Vertical profile
The shape of mullion profiles can be assigned differently to the horizontal mullions than to the vertical mullions:
 Profile: The mullions shape is defined by a profile and by its size. This list shows the profiles available for the mullions component,
including the custom profiles created with the vaProfileFromCurve
 command, or from the Profile Manager.
 Rotation: angle by which the mullions rotate around their axis, taking as the center of rotation the central point of their profile area.
- Sizes: The parameters corresponding to the mullions sizes will vary in accordance with the type of profile selected.
Supports 
Curtain walls can have supports. Supports are structural elements that support the curtain wall panels. Curtain walls can have more than one Support component.
Supports are defined by the following parameters:
Geometry
- Support type: supports can be either vertical or horizontal. If you want to combine both, add a new Support component to the Curtain Wall style.
- Apply to: options to define if supports are created at the start and at the end of the curtain wall, and in between (Middle supports).
- Placement: You can specify the Longitudinal and Transversal offset of the support position from the panels.
Profile
 Profile: The supports shape is defined by a profile and by its size. This list shows the profiles available for the support component,
including the custom profiles created with the vaProfileFromCurve
 command, or from the Profile Manager.
 Rotation: angle by which the supports rotate around their axis, taking as the center of rotation the central point of their profile area.
- Sizes: The parameters corresponding to the support sizes will vary in accordance with the type of profile selected.
